How to Make Battery Charger at Home

How to make Battery Charger at home : In the last few posts, we have told you about some different types of electronic components. These include things like diode, rectifier. All these things are connected together to make some kind of electronic device. And the most important among these is diode.
With the help of which different battery chargers and other things are made, so in today’s blog we are going to tell you about making a battery charger at home. In this blog we will teach you to make a charger for 12/9/6 voltage battery, so if you also want to make a battery charger at home. So you must read this blog completely and till the end
Battery Charger
Your UPS should have a good battery. Mostly 12/9/6 volt batteries are used in UPS. Apart from this, there are many other devices where 12/9/6 batteries are used. So if you want to make a 12/9/6 volt battery charger at home, you have to buy many different components. By combining them, you can very easily make a 12/9/6 volt battery charger at home.
What is needed to make a 12 Volt Battery Charger
If you want to make a charger for a 12 volt battery. So for this, first of all you have to take a 15 and 3 ampere step down transformer. If you want to make a charger for a 9 volt battery. So for this, you have to take a 9 volt step down transformer to make a charger for 12 volt and 6 volt batteries.
With the help of which you can convert 220 volts into 5/12/9 volts. After this you also have to buy some more electronic equipment. About which we are telling you in detail below. Below we will tell you about making the battery charger in two ways.
how to make battery charge in easy way
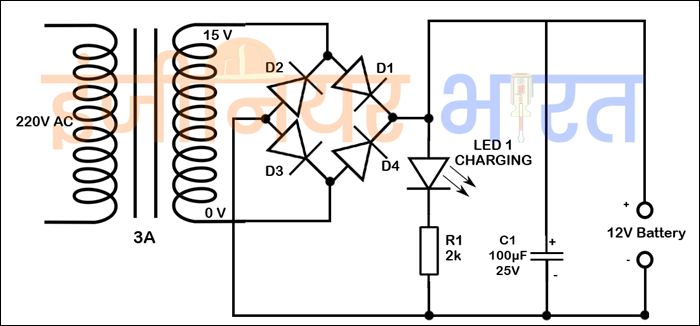
First of all, we are telling you about making a battery charger in an easy way. For this, first of all you have to take a step down transformer and rectifier according to the different batteries mentioned above. With the help of which you can rectify AC to DC. Above you can see how a battery charger is made with the help of a diagram.
This has been explained. First of all you have to take a rectifier. After that you have to install a capacitor. And you also have to install an LED resistance. Because when the battery starts charging then this LED will light up but if you make the battery charger in this way. Then it has a negative effect on your battery.
Due to which there is a high risk of your battery getting damaged. And when your battery gets charged with the help of this charger, you will not even know about it, but if you make the battery charger in a different way, then it is very good for you.
Because after applying the charger in the second way, when your battery is fully charged, you will know about it. And you can easily turn it off. Below we are telling you about making a battery charger from SCR.
What is a solar inverter and how does it work? What is a solar inverter?
Make Battery Charger from SCR
If you make a battery charger using SCR, then it is very good for you. And in this way, you can make charger for different size batteries. If you want to make a charger for 12V, 9V, 6V volt batteries, then you should make a battery charger using SCR only. This charger is very beneficial for dry batteries.
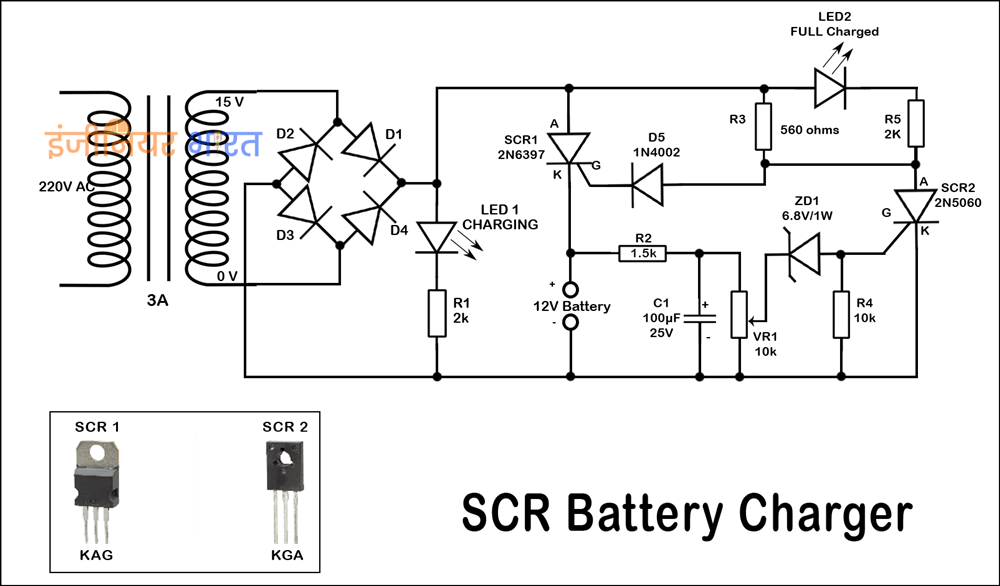
You can see the same technology inside UPS. Because this charger works automatically. Whenever your battery starts charging, an LED will light up in it and even when your battery is fully charged, you can still see an LED light up inside it.
By this you will easily know that your battery is fully charged. To make a charger with this technology, you need many different components. We have told you about them below.
| LED1, LED2 | RED – Green |
| D1-D2-D3-D4 | 1N5404 Diode |
| D5 | 1N4002 Diode |
| ZD1 | 6.8V 1W |
| SCR1 | 2N6397 SCR |
| SCR2 | EC103 SCR |
| C1 | 100uF 25V Electrolytic capacitor |
| VR1 | 10K Potentiometer |
| R1, R5 | 2K |
| R2 | 1.5K |
| R3 | 560 ohm |
| R4 | 10K |
| PCB | 1 |
| Wire | As per need |
| soldering material | As per need |
We have told you about the components used to make a battery charger using SCR. It is mentioned in the diagram. With the help of which you can make a battery charger. You have to make a charger by connecting all the components mentioned above. You have to connect all these components on the PCB so that their connection can be done easily. Then after placing all these components on the PCB, your circuit becomes very small.
If you want to set all these components on a PCB. So a picture is shown above. And along with this PCB, you also have to install a step down transformer. And then your battery gets fully charged. After making this charger, you also have to do some settings. With the help of which when your battery gets fully charged. Then you see the LED. Then you have to start the supply in the circuit.
If your battery is fully charged, then you have to slowly rotate VR1 clockwise and keep rotating it until your LED2 starts glowing. When your LED2 starts glowing, then stop rotating it and then your charger will be set to your full battery.
Circuit Modifications
If you want to make a charger for 6V, 9V, 12V volt battery. So for this you have to make changes in your circuit. Because you also have to make changes inside the amplifier installed in the circuit. Only then you can change it according to 6V, 9V, 12V. Below you have been told about some components and transformers. With the help of which you can change it according to 6V, 9V, 12V
| Battery Voltage | Transformers Voltage | Zener Diode voltage | R3 and R5 |
| 6 volts | 9 volts | 3.3 volts | 1K |
| 9 volts | 12 volts | 4.7 volts | 1.5K |
| 12 volts | 15 volts | 6.8 volts | 2K |
Above we have told you a very good charger circuit for 12 volt battery. But if you charge the battery with the help of this charger, then you will know only after your battery is fully charged, but it is not safe to charge the battery with this type of charger. Because when your battery is fully charged, this charger does not turn off automatically, but you have to turn it off.
This has a negative effect on your battery. But if you use relay with LED2. Then it cuts off the supply after your battery is fully charged. With the help of which your battery will stop charging and your battery will also be safe if you maintain this charge.
So with the help of this charger you can easily charge a normal 12 volt battery. And if you want to charge a 6 volt battery. Then you have to make changes in the components mentioned above. Only then will you be able to charge a 6 volt battery.
We hope that you liked the information given by us about making a battery charger at home. If you liked this information and want to get more such information, then you must visit our website.


